Table of Contents
ownCloud
We are operating the cloud storage service ownCloud at https://owncloud.cesnet.cz. This application is best suited for smaller amount of files that you want to access via web interface. You can sync your files between PC or mobile devices or share them with your colleagues. You can also use ownCloud to share contacts and calendars.
To use ownCloud, you have to be an employee or a student of an academic organization. For technical reasons, you have to have an account in eduID.cz. 1). You have to comply with (terms of the service) as well. There is no need to register anywhere, your account will be created automatically when you log in for the first time.
How to log in:
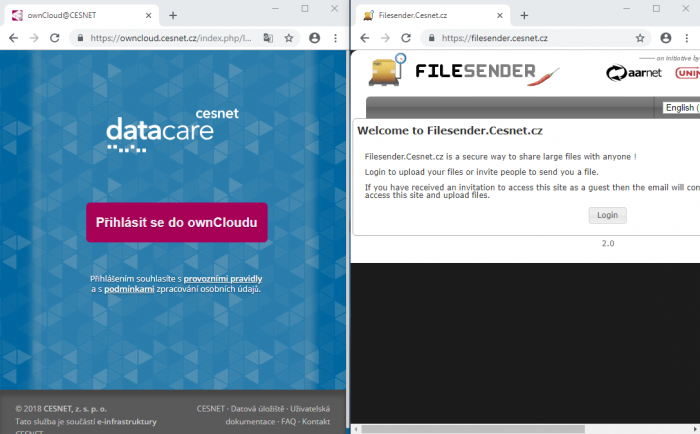
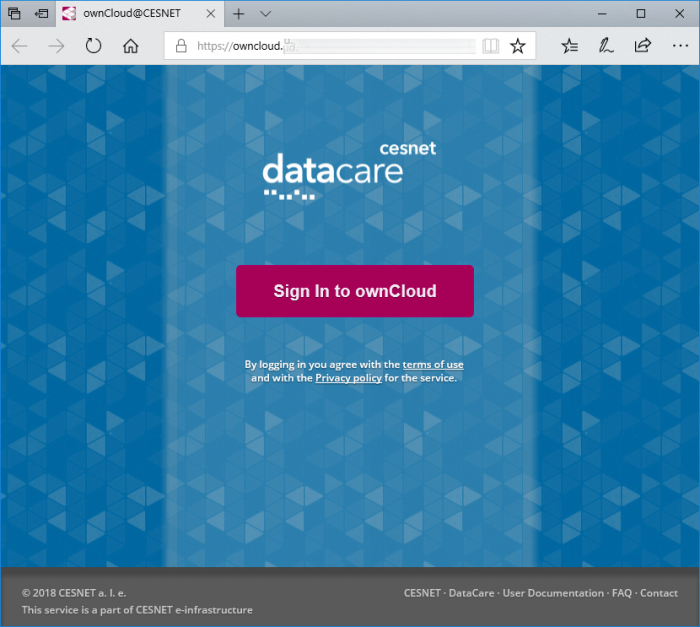
1. At the website https://owncloud.cesnet.cz click on “Sign In to ownCloud” button.
2. Now you shall be redirected to the selection list of an identity providers (e.g. CESNET, CTU, MUNI…)
3. Please select your identity provider and then log in.
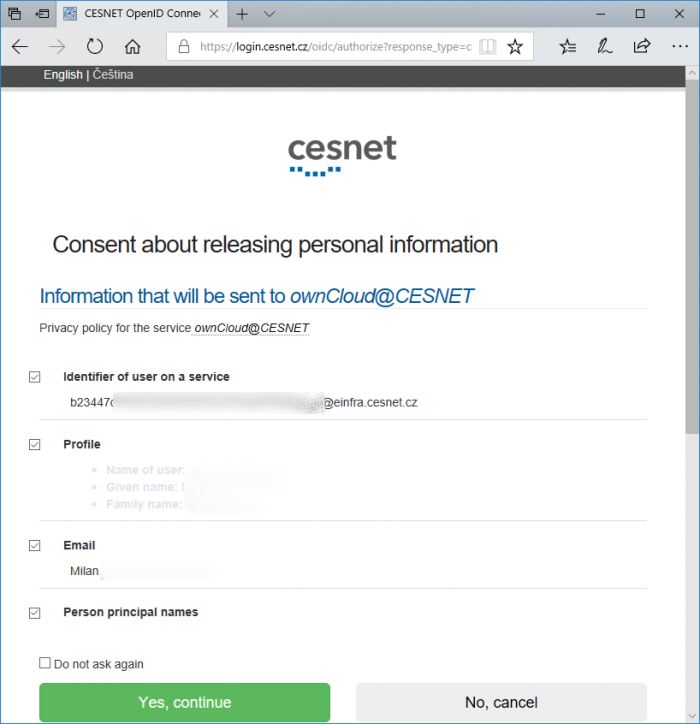
4. After logging in you will be redirected to the websites, where you will be asked to express your approval to deliver several attributes required for OwnCloud service. Those attributes are used to verify that you are authorized to use OwnCloud service.
5. You will be logged in to ownCloud after clicking on the Authorize button.
After first logging in, you will be notified via email.
First logging into the CESNET e-infrastructure
CESNET e-infrastructure services use a unified user management system (if technically possible) for managing user access. In case you haven't used Data Storage services nor MetaCentrum facilities so far, you will be asked to register your identity into the CESNET e-infrastructure. You may be asked to do so if you accessed those services using a different identity than you trying to access ownCloud. Should you have more identities in academic institutions, you can (in fact, you are strongly recommended to) connect them into a single one (so that the e-infrastructure recognises that, e.g. jan.prochazka@cesnet.cz is the same user like jan.prochazka@cvut.cz).
How to sign into the e-infrastructure and to register to ownCloud:
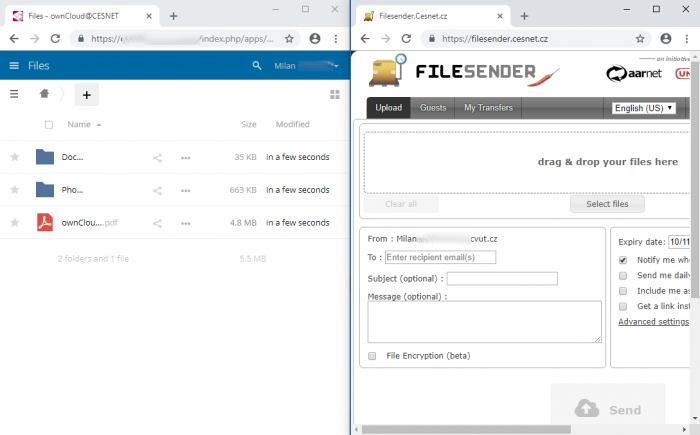
1. Visit https://owncloud.cesnet.cz or https://filesender.cesnet.cz in your web browser and click on Sign In to ownCloud button or Login button in case of FileSender service. Select your institution from the list and log in using your credentials as usual.
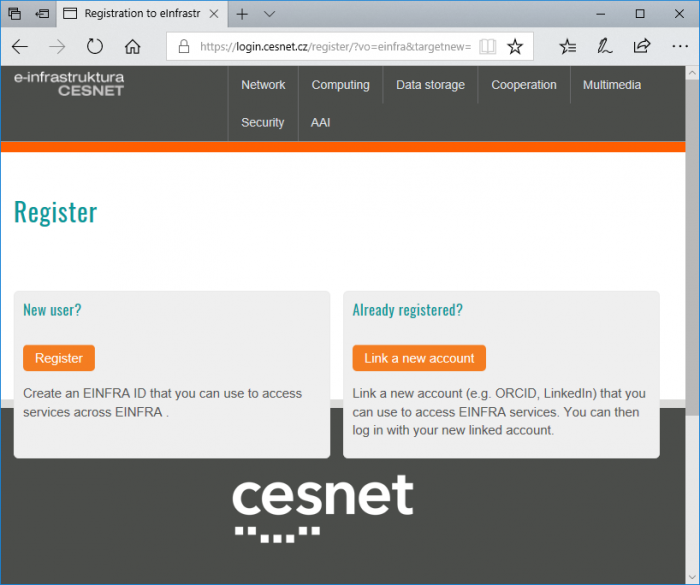
2. On the following page, click Register in the “New user” section.
If you are familiar with identity management in the e-infrastructure, you can connect your account with another existing identity (identity which you used to connect for instance to the MetaCentrum). This can be done later, so if you have no idea what this paragraph is about, just continue to the following item, no harm will be done. If you wish to consolidate your identities, please click on Link a new account in the section “Already registered?”. Then you will be redirected to the page where you can select the other identity. Then you sign in again and then the system will connect both identities into one.
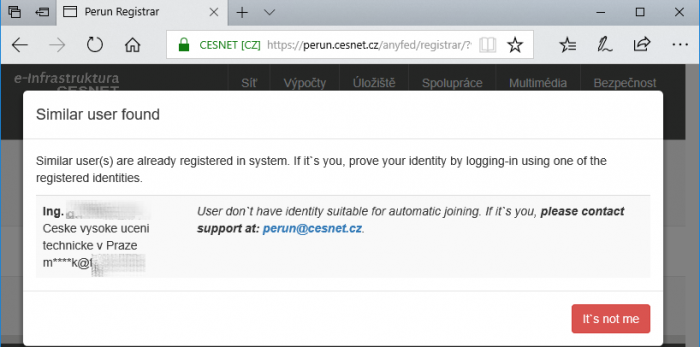
3. After choosing registration as a New user, the procedure will be as follows. The app will search for registered users (existing accounts). If there is any user with the same attributes as yourself, the app will offer you joining both accounts into one. List of identities that have been recognised as possibly yours will be shown in the dialog box. If this is correct, you are advised to join the identities.
In case none of those identities belongs to you, please click on the It's not me button.
If the system found your identities, but it indicates that they cannot be merged automatically, contact the user support as you are advised by the system.
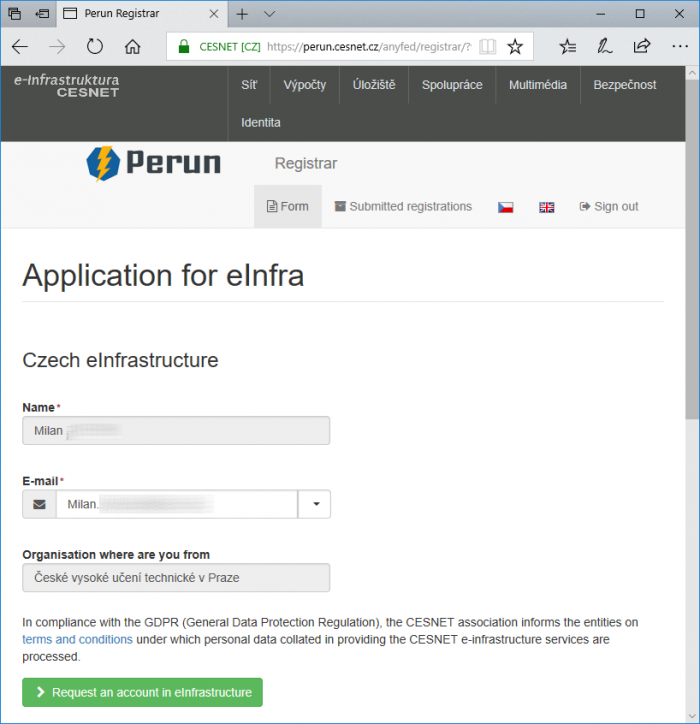
4. In the following page, a short form with prefilled attributes (name, email, …) will appear. In the end of the form please click on the Request an account in einfrastructure button.
5. In the next page, your registration will be confirmed. You are now member of einfra. Simultaneously you will receive a confirmation email. Your registration will be immediately approved, which is stated by another email confirmation. Now you can continue by clicking on the Continue button. Now you will be redirected to the required service.
6. Now you are requested to agree with releasing attributes that are necessary to use the ownCloud/FileSender service.
7. After clicking on Yes continue button, you will be redirected to ownCloud/FileSender itself and you can start to use it.
Desktop client
Download here: http://owncloud.org/sync-clients/
Desktop client usually check automatically for new versions. So the Desktop client can be updated immediately after the new version release. If you wish you can download the newest version at ownCloud web.
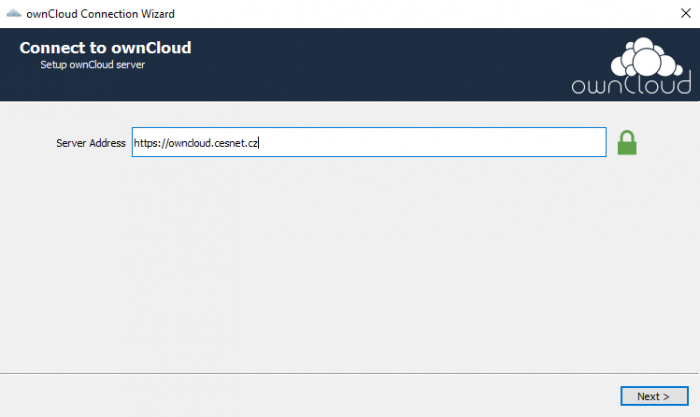
1. Download the client app from the ownCloud web page and run the installation. Further insert the ownCloud address https://owncloud.cesnet.cz into the address field and click on Next button.
2. After clicking on the Next button, you web browser will automatically start and open a login web page. That action is evoked due to required authorization of desktop client to your ownCloud account. Now you can click on Sign In to ownCloud, then select your organization and log in.
3. After logging in, you will be asked to release several attributes necessary for operation of the ownCloud service. If you agree, please click on Yes continue button.
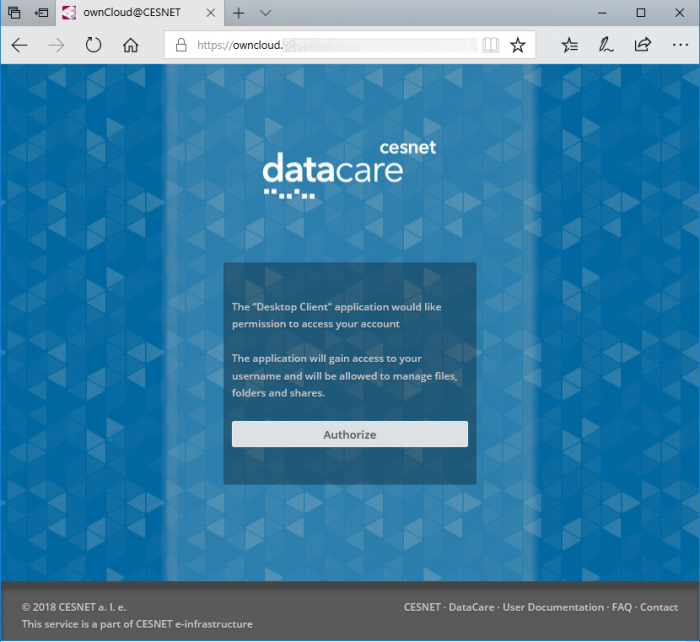
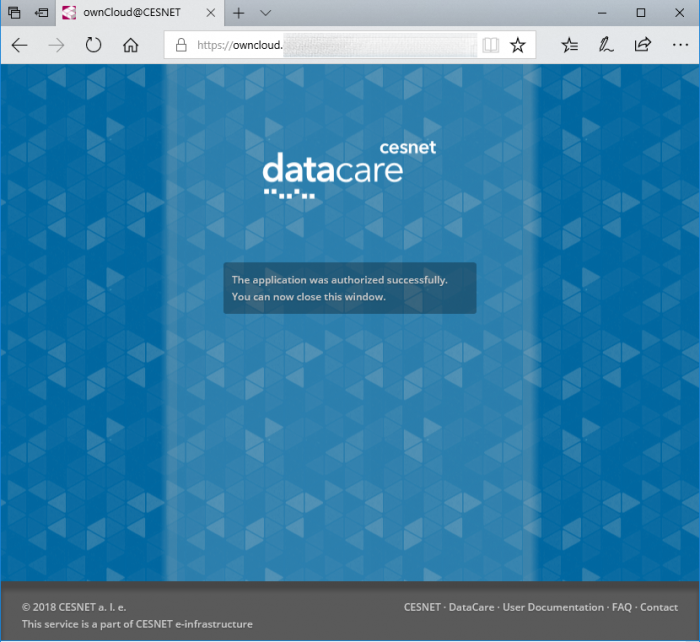
4. In the next step, you will be asked to confirm authorization of desktop client, please click on Authorize button. That action will create a token which grants access to your ownCloud storage.
5. Now you can close the web browser.
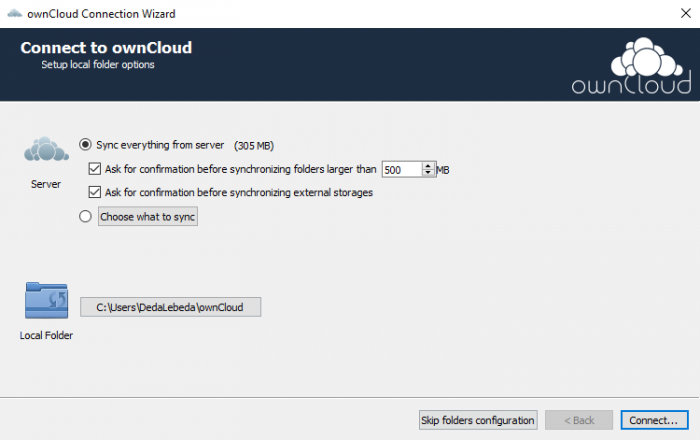
6. The path on local drive could be the same as prefilled or you can change it. Now just click on Connect… button and our ownCloud desktop app is set up.
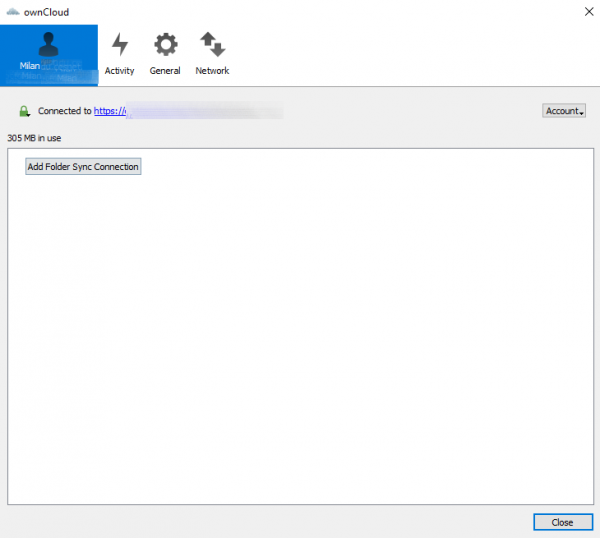
7. The last dialog box will show us desktop app dashboard, where we can manage syncing or track an activities of sync and so on.
Mobile client
Download the mobile client here:
Windows Phone (unofficial client)
Access and connection via Mobile Client are very similar like it is described in the section Desktop client.
First steps after the Desktop client installation
Disabling the synchronization of the Shared folder into the local directory
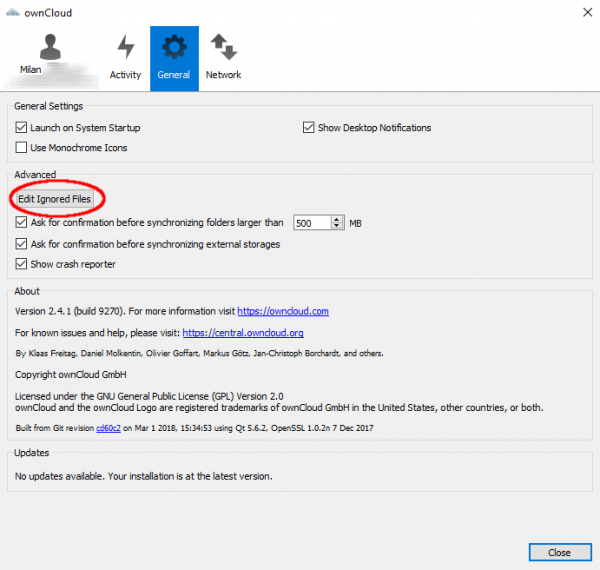
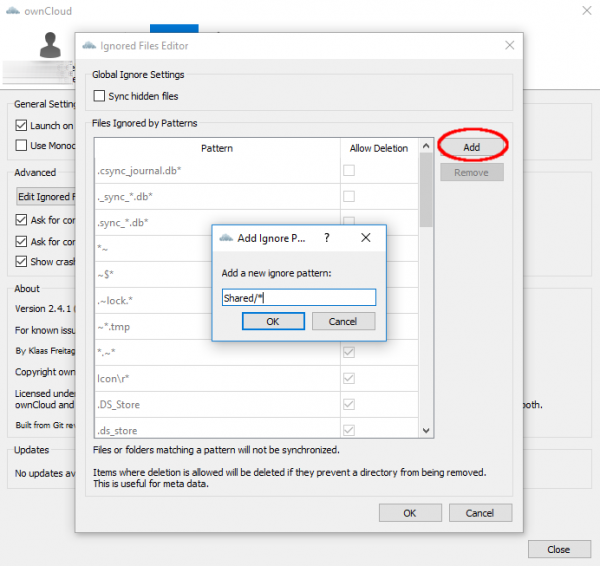
Step-by-step guide how to tweak the rules (see the image):
1. Open the window for the rules definition to define which files should be omitted. Go to bookmark “General” and then click on Edit Ignored Files.
3. Add rule “Shared/*” (no quotes) and do not forget to tick it, to make it active.
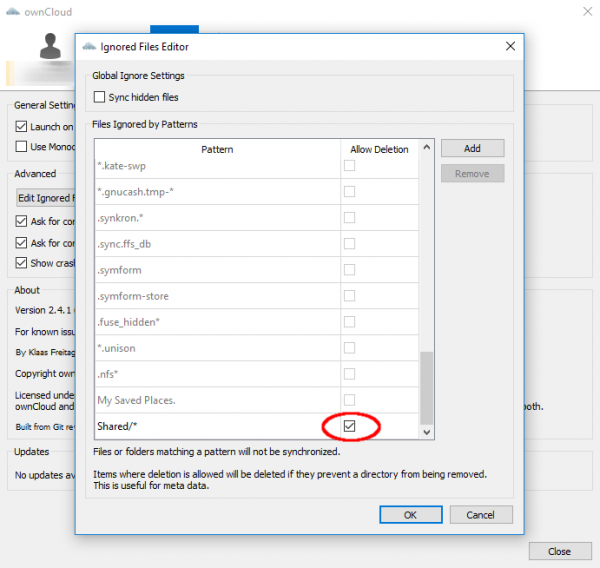
4. After you click on OK desktop client stops to sync Shared folder. That action does not have influence on the data on server. On the server (via web interface) you have all shared data still available and you can download it.
Setup of client sync frequency
Desktop client is defaultly set to check every 30 seconds for the changes in the files uploaded in the ownCloud server. Sometimes it can be desirable to set up sync frequency higher or lower. Sync frequency can be set in the ownCloud configuration file, which can be found in:
- Linux:
$HOME/.local/share/data/ownCloud/owncloud.cfg
- Windows:
%LOCALAPPDATA%\ownCloud\owncloud.cfg
- Mac:
$HOME/Library/Application Support/ownCloud
You can add new row remotePollInterval=30000 into the section [ownCloud], where the numeral value is desired sync frequency in milliseconds.
Share your files
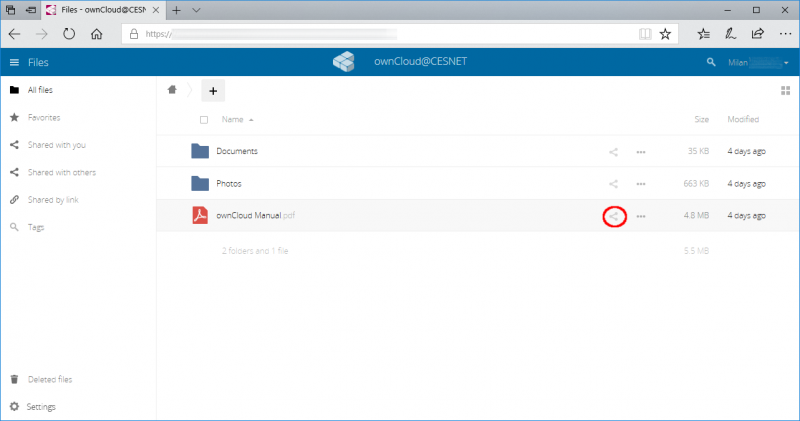
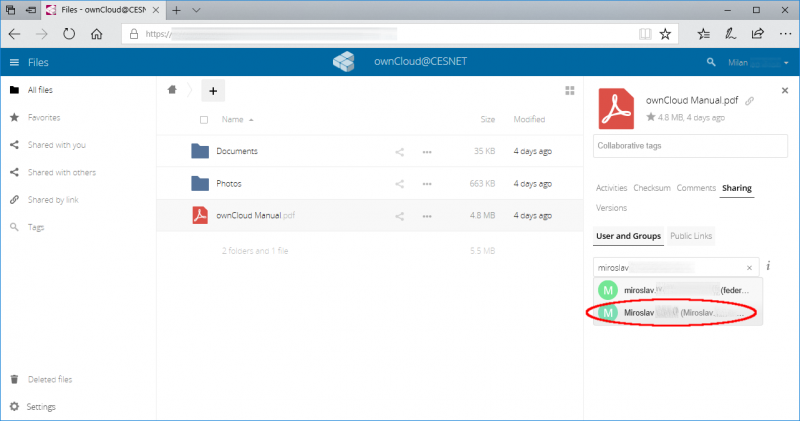
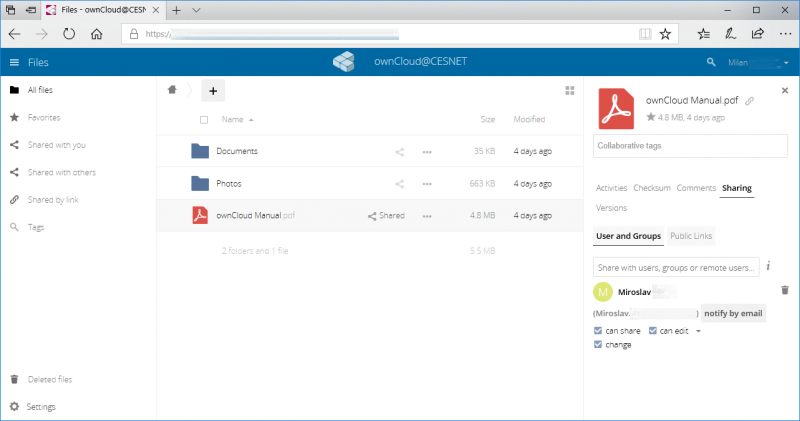
In ownCloud, you can share any file with any other registered ownCloud user. To share your files with an user you have to know the email of the user. Sharing setup is shown on the following figures.
1. Click on sharing symbol on any file you wish to share, see below.
2. There will appear dialog box and you will be asked to insert email of user you wish to share the file / directory.
3. Now we can insert user email (either we know it, or we can ask particular user for it - you can click on your name in right up corner and then click on Settings button). We can also modify rights for editting etc., which we want to to give to the user. An user can for instance further reshare or edit your data. User can see all shared files in the “Shared” folder. We can also remove particular user from sharing (click on the bin symbol in the right section).
Do not forget that user must be registred in ownCloud service, if you wish to share any data with him/her.
Sharing your files and occupied space
Space occupied by the shared files is counted into the occupied space of the user who created this files.
Shared files
If user A shares a file F with user B, size of the file F will be counted into the user A's occupied space. This is also valid in case of change or increasing the size of the file F by the user B.
Shared directories
If user A shares a directory D with user B, any file uploaded or changed in the directory D by the user B is counted into the user A's occupied space.
Share via link (public sharing)
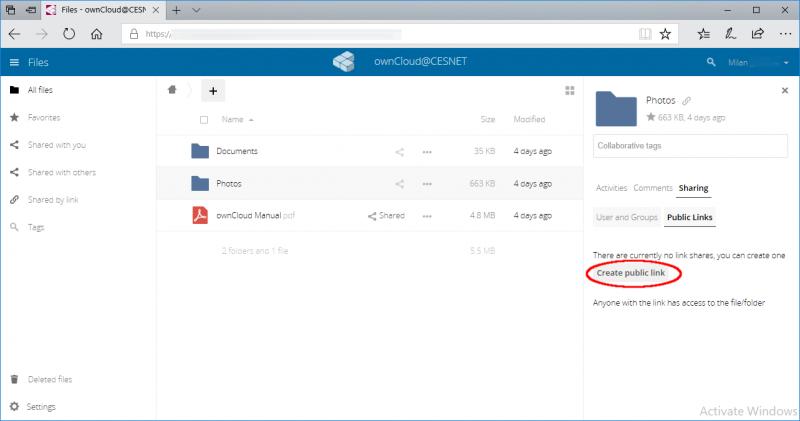
Except sharing between the ownCloud users, you can also share any folder or file with the persons, who don't have ownCloud account.
1. Please click on the sharing symbol on the selected file/directory and then click on Create public link.
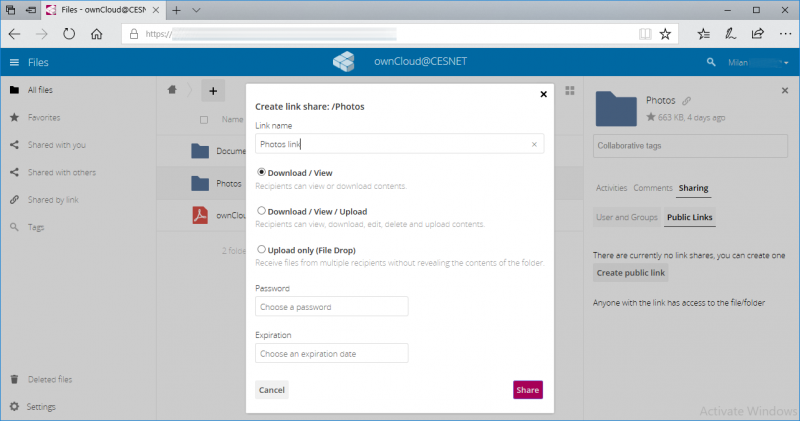
2. Now you can insert link name or modify access rights and set the access password. After you have finished setup please click on Share button.
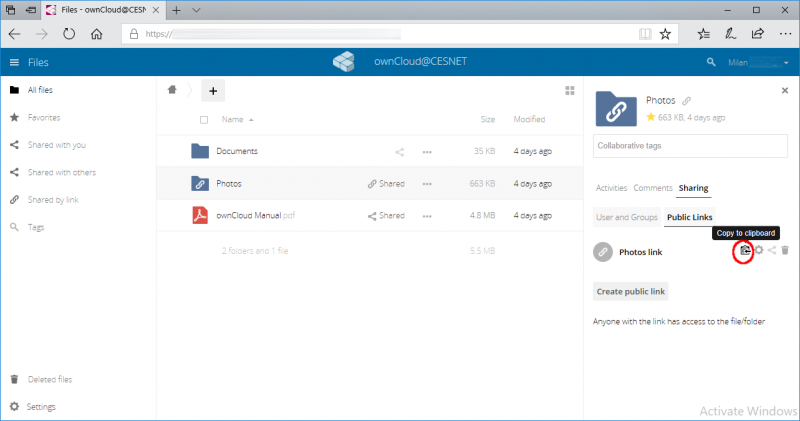
3. You can copy and send the link to the user which you wish. You can also use sharing the link directly via social networks.
Access via WebDAV protocol
You can also access your ownCloud account remotely using webDAV protocol.
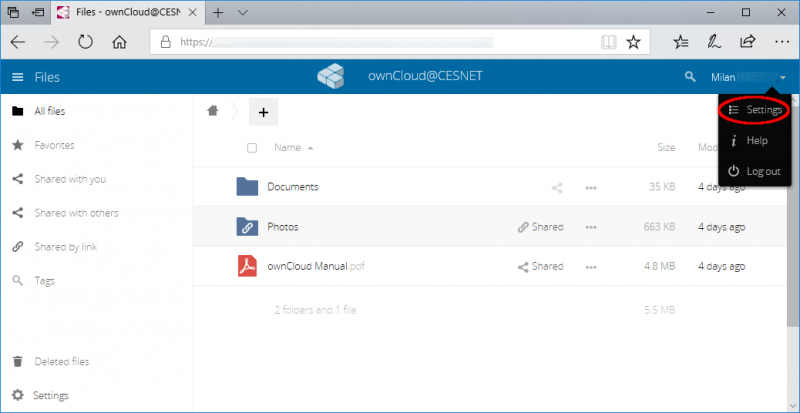
1. Log in to the ownCloud web via address https://owncloud.cesnet.cz and click on your name in the right up corner. Then click on Settings.
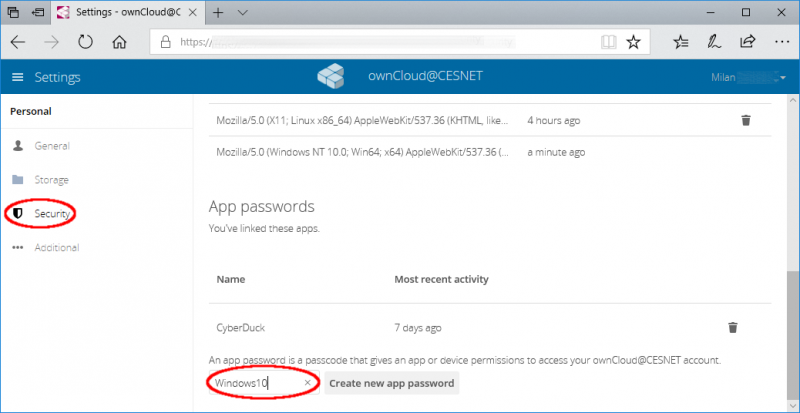
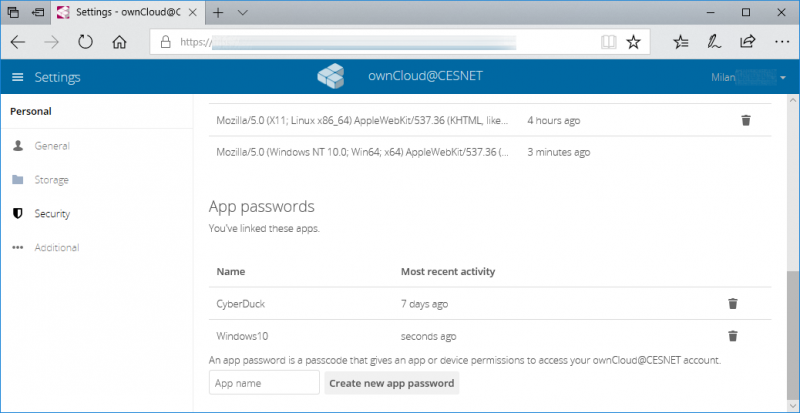
2. Now click on Security option in the left menu. Then scroll to the bottom and in the section App passwords insert the name of your app. Then you can click on Create new app password.
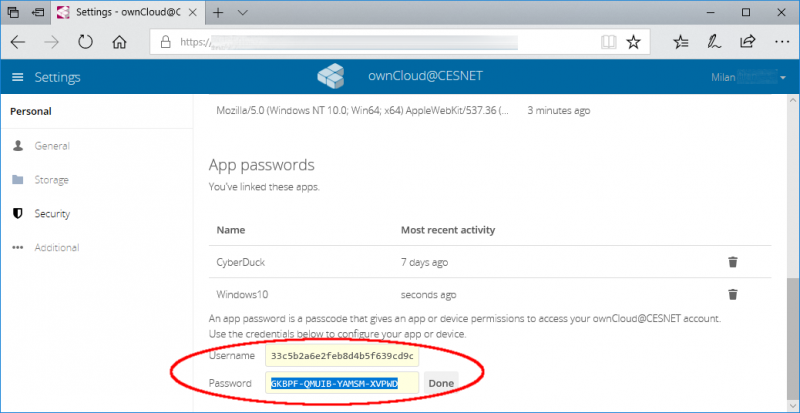
3. Now there appeared Username and Password(please note it). Latterly you will insert it to the corresponding fields in the app. The app can then access your account via webDAV protocol.
4. After clicking on Done button is the setup done. In case you will wish to un-authorize some app you can click on the bin symbol.
5. Now you can continue to app settings itself. The address for webDAV acces is:
Contacts synchronization from ownCloud into email client
Contacts saved in your ownCloud account can be synchronized with your email client by using carddav protocol.
For ThunderBird is necessary to install CardBook plugin. Then you can use following link to synchronize your contacts.
https://owncloud.cesnet.cz/remote.php/carddav/addressbooks/user_name@domain.cz/
Disable/Enable auto updates of the client app
Version 1.7 and newer of ownCloud Desktop clients have an auto updates. These auto updates is impossible to disable in graphical interface. In case you want to keep the specific ownCloud Desktop client version you have to disable auto updates. Disabling auto updates could be useful in case of any bugs in the new ownCloud Desktop client and so on. To disable auto updates it is necessary to change configuration files or registry.
In the following sections you can find the methods for disabling/enabling the auto updates for Windows and other platforms.
Windows - registry key (simple version; run as administrator)
You can disable the auto updates by entering registry key skipUpdateCheck type DWORD and value 1.
We also prepared registry keys. You can download our *.reg files from the links below. This registry keys could be easily installed. Just click on them and then confirm the inserting of the keys to your registry. All changes will appear after you restart your PC.
- Windows 32bit
- Windows 64bit
Windows - modify config file in LocalAppData
In your user folder locate file %LOCALAPPDATA%\ownCloud\owncloud.cfg (commonly located in %LOCALAPPDATA% on the path C:/Users/<jmeno>/AppData/Local and the folder AppData is hidden, so you have to enable Show hidden files).
You can open owncloud.cfg file via Notepad. In the section [General] enter this row:
skipUpdateCheck=true
In case you want to enable auto updates change the value true to false, or remove the row skipUpdateCheck=true.
Other platforms - Linux, OS X
You can locate config file in Linux in ~/.local/share/data/ownCloud/owncloud.cfg.
in OS X is config file located in ~/Library/Application\ Support/ownCloud/owncloud.cfg.
You can open owncloud.cfg file via text editor. In the section [General] enter this row:
skipUpdateCheck=true
In case you want to reenable auto updates change the value true to false, or remove the row skipUpdateCheck=true.
What to do in case of any problems
In case of any problems or questions please feel free to contact us at support(at)cesnet.cz.
You can also see full ownCloud User Manual
However this guideline doesn't respect our modifi cations.
Frequently Asked Questions (FAQ)
We do not recommend you to use Internet Explorer 11. JavaScript required for ownCloud web interface is not working properly.
Internet Explorer 6 is using vulnerable SSLv3. By the reason of keeping the security, our servers require TLSv1.0 and higher. Thus it is necessary to use web browser, which doesn't use SSL, but TLS.
I've just logged in and I can't see my files
Problem description: I have logged in via different identity provider compare to my first logging in. Now I don't see my files. Why?
Solution: We suppose, that you have used different identity for your current logging in than in the past. In case you have used more identities of different organizations, for each of your identity (past and current one) was created new ownCloud account. For this kind of issue is necessary to join (consolidate) both your identities into one. So afterward no matter which identity you will use you shall see still same files. To consolidate your identities please contact us at support(at)cesnet.cz
Repeating request for ownCloud client authorization
Problem description: There appear authorization request after every system startup, which keeps opening my web browser.
Solution: That issue is related to storing of the ownCloud access token. If ownCloud client starts prior to the subsystems containing stored access token, ownCloud client requires to re-authorize the access.
In case of Linux system it is necessary to use Keyring service provided form your environment (e.g. Keyring, MATE Keyring and so on). Although you use Keyring service, it is possible that ownCloud client starts prior to the subsystems. In case of Windows it is very similar bug. Re-authorization problem will be fixed with new version of ownCloud client.
After I uploaded my file I cannot see it
Problem description I was uploading file via web interface. After it finished I cannot see my file. Why?
Solution: Uploading of one file via web interface is possible maximally for 4 hours. If you will upload your file via ownCloud Desktop client this restriction is invalid. So to upload your files, please use Desktop Client, see the section Desktop client
Problems related to Desktop Client connection
1) Problem description My client cannot connect to the ownCloud server even I am using correct password.
1) Solution:
ownCloud version 10 and login procedures deployed in June 2018 need desktop client version at least 2.4.0.
Desktop client usually check automatically for new versions. So the Desktop client can be updated immediately after the new version release.
We recommend you to use for update: ownCloud webpage, where are available official Dekstop clients for various platform i.e. Windows, OS X and Linux. For Linux is also useful to install repository. Due to this repository you can install new versions in common way (apt-get update, yum update …).
Problems with file sharing
Problem description I am trying to share file with my colleague and I cannot find his/her username (email address).
Solution: Due to security reasons is unsuspecting prohibited. To share given file with any user, this user must be registered in the service https://owncloud.cesnet.cz/. Further you can use sharing by utilization of ownCloud contacts. Other possibility is to know full username of your colleague. The user name is not necessarily email address, which you are used to use. Your colleague can find the username in page “Personal” in ownCloud web interface (Please log in to the web interface → In right up corner click on your name → Personal).
Synchronization of the executable file
Problem description I have synced executable file from one computer to the second computer. However the file is not executable on the second computer.
Solution: ownCloud server is not supporting the transmission of the file permissions. During the file transmission from one client to the second client are the the file permissions lost. More info at: https://github.com/owncloud/core/issues/6983
Problem with synchronization of some directories
Problem description OwnCloud refuse to sync some folders. It says: “There are available new directories, which have not been synced because of their large size see: ownCloud/… (directory list).”
Solution: The solution is to open the list of folders and pick all the large folders. Then click on “Apply” on the bottom of the error message.
Problem with synchronization of the files with long name
Problem description OwnCloud refuse to upload the file with very long name. Synchronization end up in “Connection closed nebo Bad Request”.
Solution: Maximum length of the file name is 210 characters.
Issue to log in via webDAV protocol in Windows
Problem description After I put my credentials and hit Enter there is repeatedly appearing always the same dialog box for entering my credentials.
Solution: Please check the drives in My Computer although the credential dialog box appears. If the Network Drive is still not connected it is necessary to edit the Windows Registry Keys. You can continue with following guide.
Edit Windows Registry Key
Edit Windows Registry Key
1. Click Start, type regedit, and then press Enter.
2. Locate and then select the following registry subkey:
HKEY_LOCAL_MACHINE\SYSTEM\CurrentControlSet\Services\WebClient\Parameters
3. On the Edit menu, point to New, and then click Multi-String Value.
4. Type AuthForwardServerList, and then press Enter.
5. On the Edit menu, click Modify.
6. In the Value data box, type the URL of the server that hosts the web share (https://owncloud.cesnet.cz/remote.php/webdav), and then click OK.
7. Exit Registry Editor.

