Table of Contents
Configuration and controls of encryted bucket using rclone tool
This guide describes the configuration and controls of encrypted buckets using rclone tool. It goes about client-side encryption. Below are the guides for setup using the command line and for setup using the graphical user interface.
Configuration using the command line
Rclone has a wizard that eases the setup of an encrypted bucket.
Windows user needs the Command Prompt tool, where he/she can directly start the rclone configuration using the command below.
Linux user needs just to open the Terminal window and continue with following rclone.
rclone config
On the displayed list of the options, we will select New remote via typing n. Then we will insert the name of our data storage, for instance, cesnet_s3_encrypted. Then we will select Option Storage, and here Encrypt/Decrypt a remote.
In the next step, we have to define Option remote. Here we need to select existing S3 profile/connection and define the name of the bucket where will rclone create the encrypted space. We have to use the format s3-profile:bucket-name.
Then we need to select Option filename_encryption. There we can select Encrypt the filenames alternatively, we can keep it empty if we wish to not encrypt the filenames.
Then we can select Option directory_name_encryption. There we can select Encrypt directory names alternatively, we can keep it empty if we wish to not encrypt the directory names.
In the next step Option password we have to choose an encryption password.
Furthermore, we recommend choosing Option password2. This password will be used as salt for consequencing encryption.
Option Edit advanced config can be skipped, option n.
The configuration is completed now. In the next step, we can confirm the option Keep this encrypted config remote using option y.
The last step is to check the encryption. Firstly we need to list available configurations/connections.
rclone listremotes
cesnet_s3_encrypted:
cesnet_s3cl2:
Then we can using sync command upload three pictures into decrypted bucket.
rclone sync --progress --fast-list /home/user/source-dir cesnet_s3_encrypted:
Now we can list decrypted bucket, where we have uploaded three pictures.
rclone ls cesnet_s3_encrypted:
   256805 DSC_0004.jpg
   337491 DSC_0006.jpg
   251493 DSC_0005.jpg
In the end, we can list the encrypted bucket, where we can see three encrypted files.
rclone ls cesnet_s3cl2:test-encryption
   256901 1er0np7kppc9jvkt7kr8f9sn90
   337619 cuqqkkhsklbnf1eegkujfkrcl4
   251589 pelqqer8osssa4k8uon95a4o6c
Configuration of the encrypted bucket using the graphical user interface
Firstly you need to deploy the graphical user interface. Windows users need the Command Prompt tool and then run the command below. The command below should open your web browser with rclone GUI. The same process is valid for Linux users, who need to open the Terminal window and run the command listed below.
#rclone rcd --rc-web-gui
The following steps are identical for Windows as well as for Linux users.
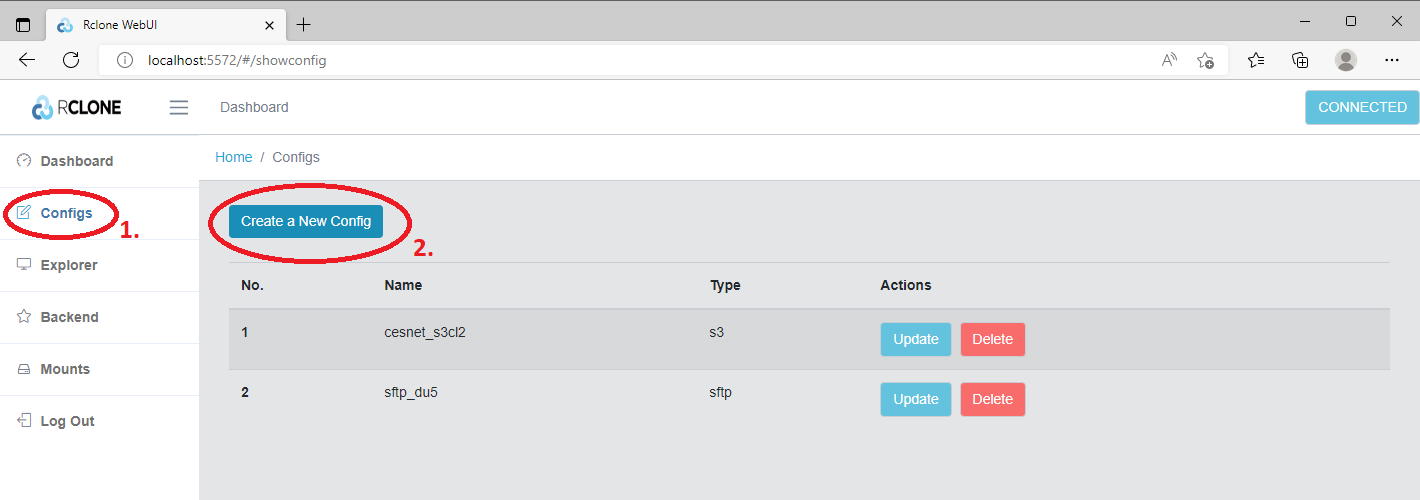
After GUI startup we will click in the left menu on the Configs (1) button and then on the Create a New Config (2) button.
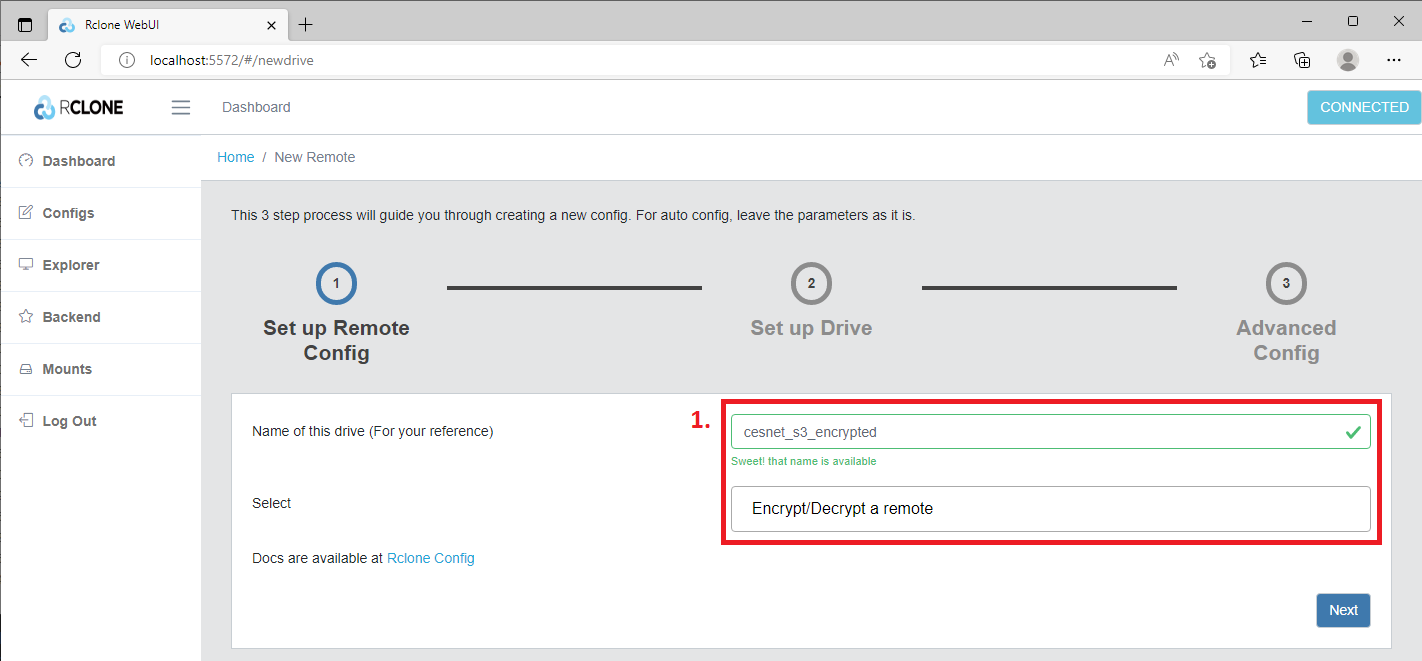
Firstly, we need to type Name of this drive (1) and then we will select from the menu option Encrypt/Decrypt a remote (1). Then we will click on the Next button.
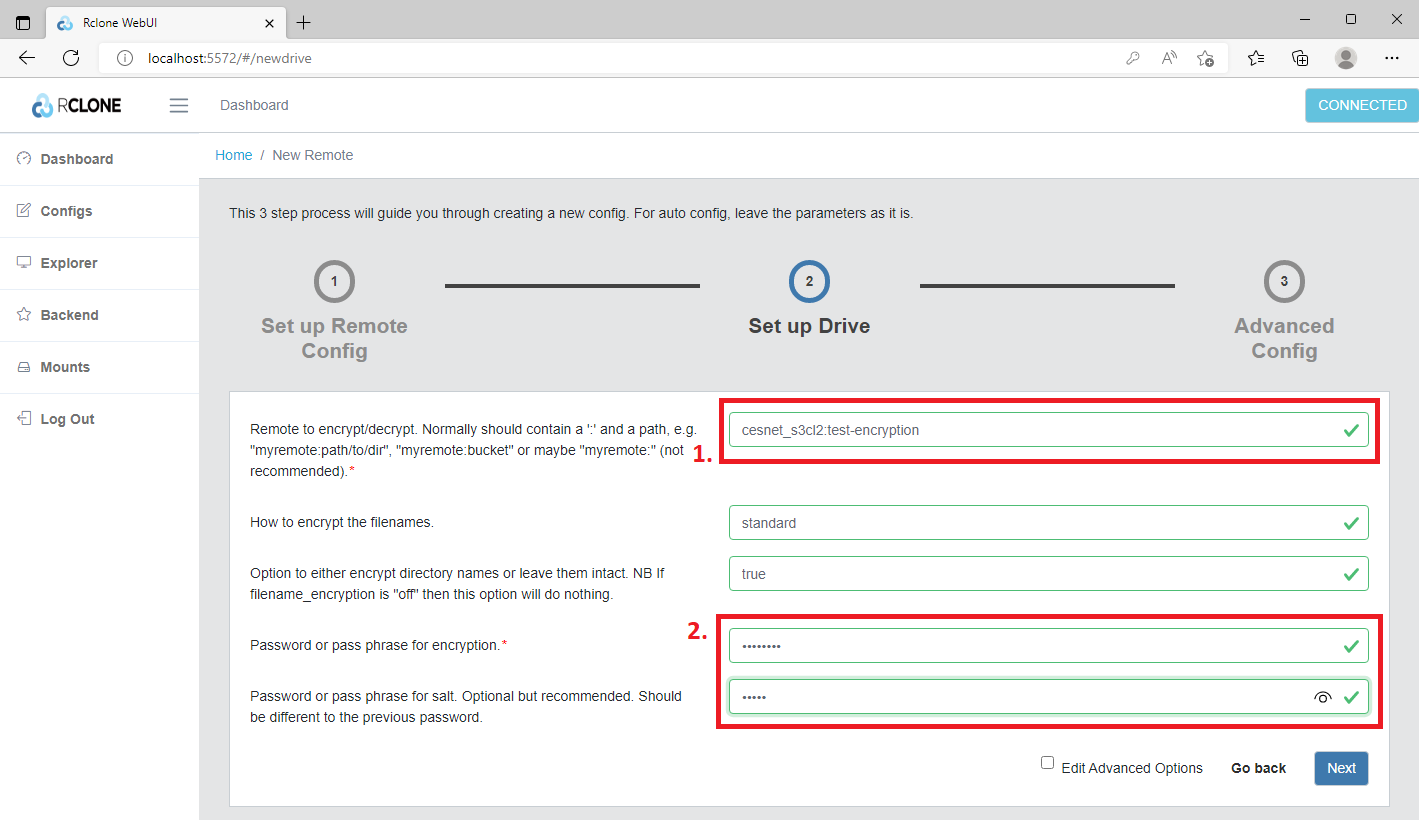
In the next spet, we need to specify Remote to encrypt/decrypt (1). Here is important to define the already existing S3 profile/connection and the bucket name where we wish to create encrypted space. The input must be here in the following format s3-profile:bucket-name. If you choose non-existing bucket rclone will create it. Then we will choose the Password for encryption (2) and also recommended Password for salt (2).
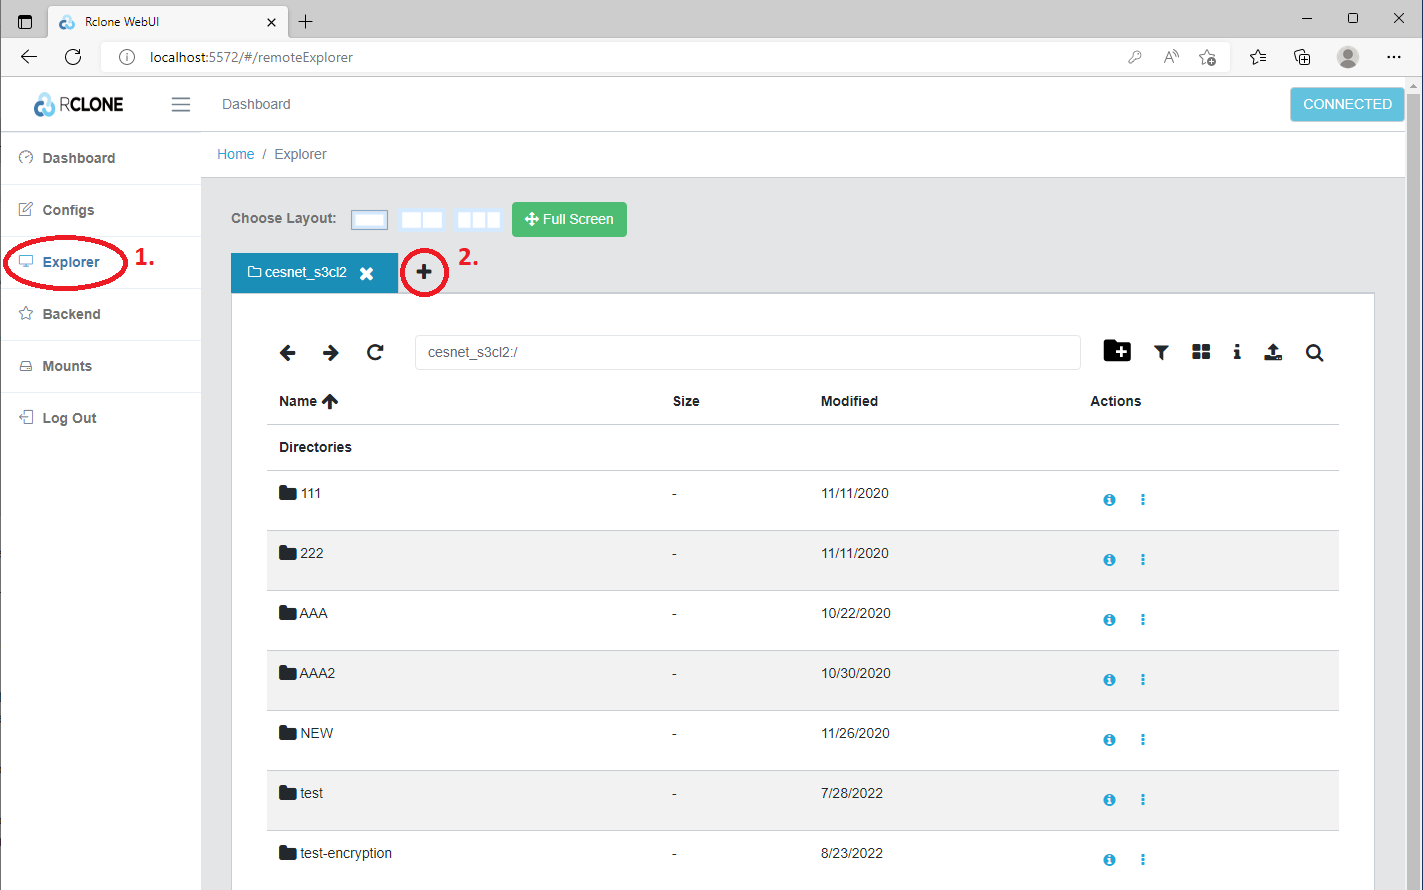
Then we need to click on the Explorer (1) button. Now we are in browser mode and then via clicking at + (2) we can open a new tab with an encrypted bucket.
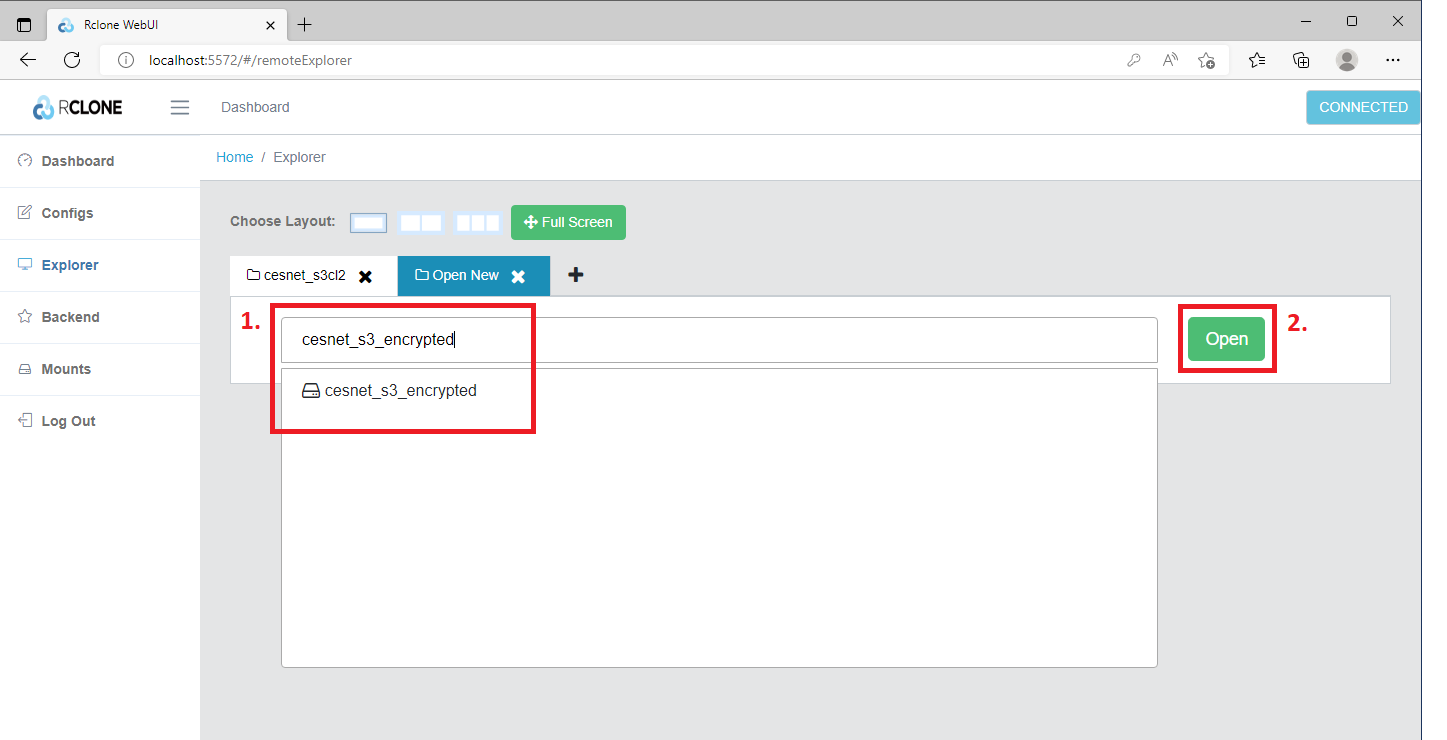
Then we need to click in the field Type the name of remote you want to open (1) and select the corresponding name of the encrypted bucket (1). Then we can continue by clicking on the Open (2) button.
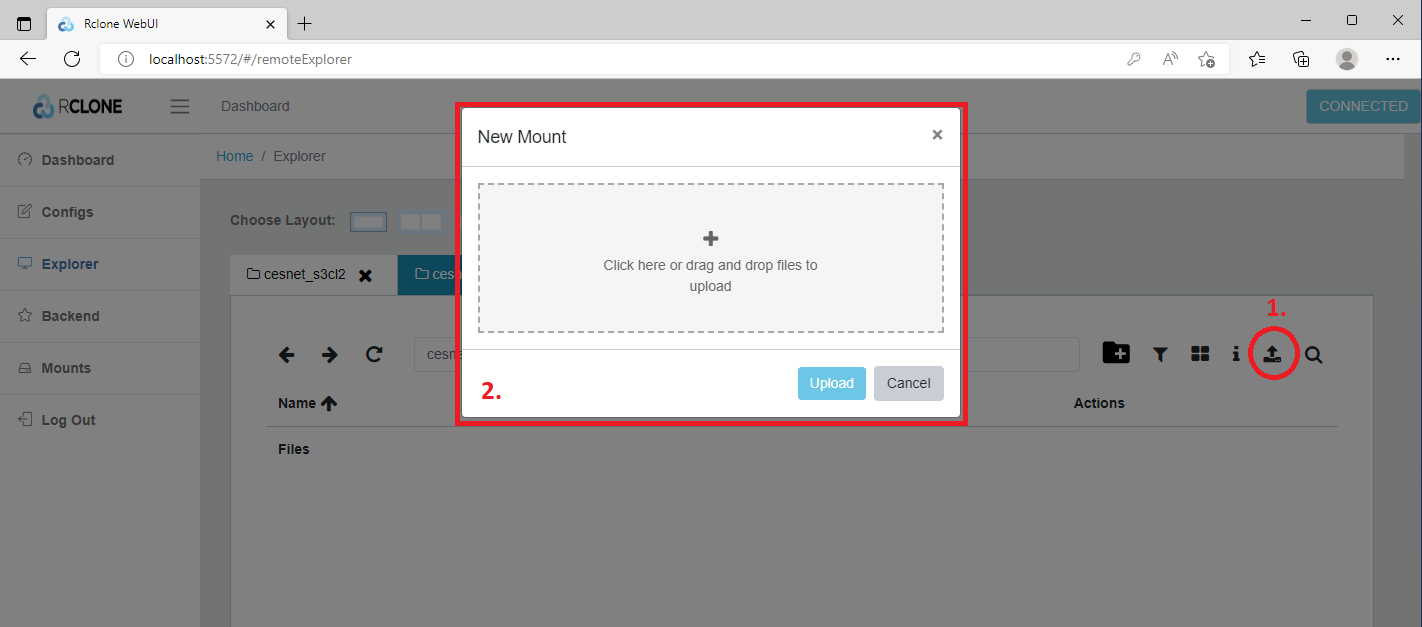
At this moment we can start to upload the data which we wish to be encrypted. Just click on the Upload (1) icon and then you can select the data from the local disk or you can drag-and-drop your data using interactive window (2).
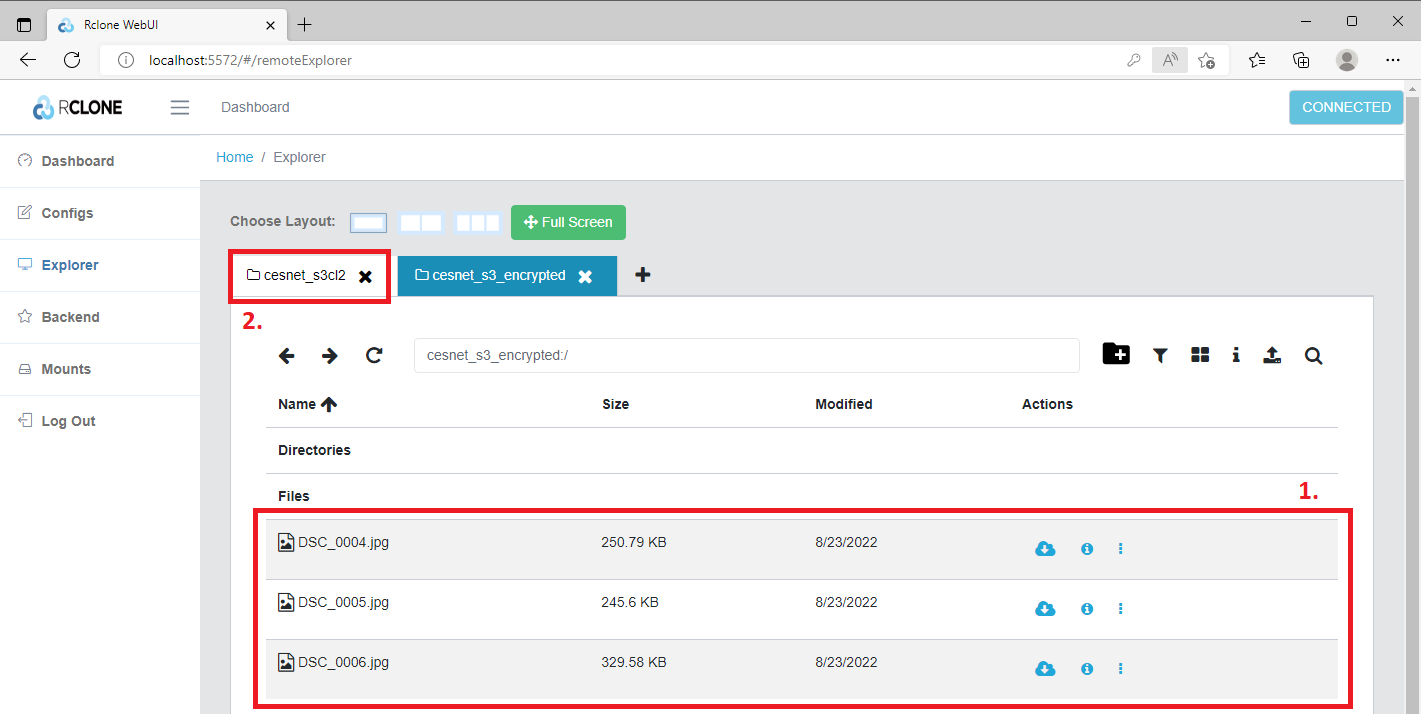
In the example below we have uploaded three pictures (1) into decrypted volume. We can check the upload in explorer by opening the remote S3 storage in the tab (2).
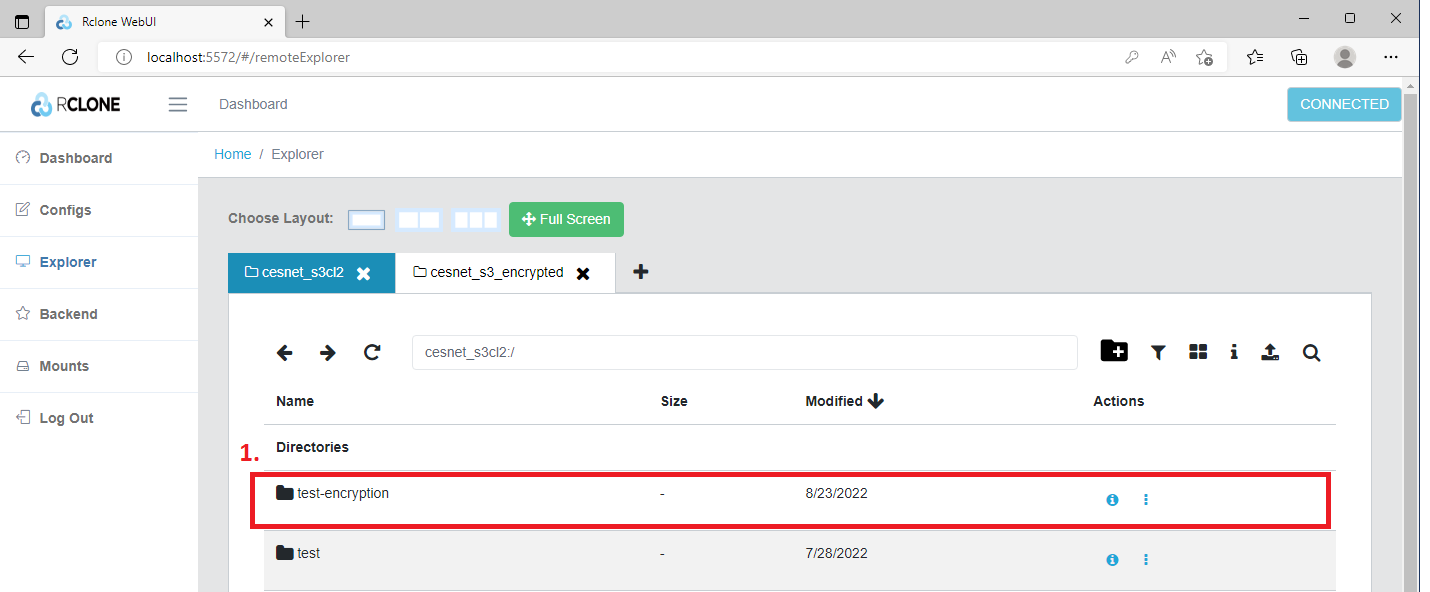
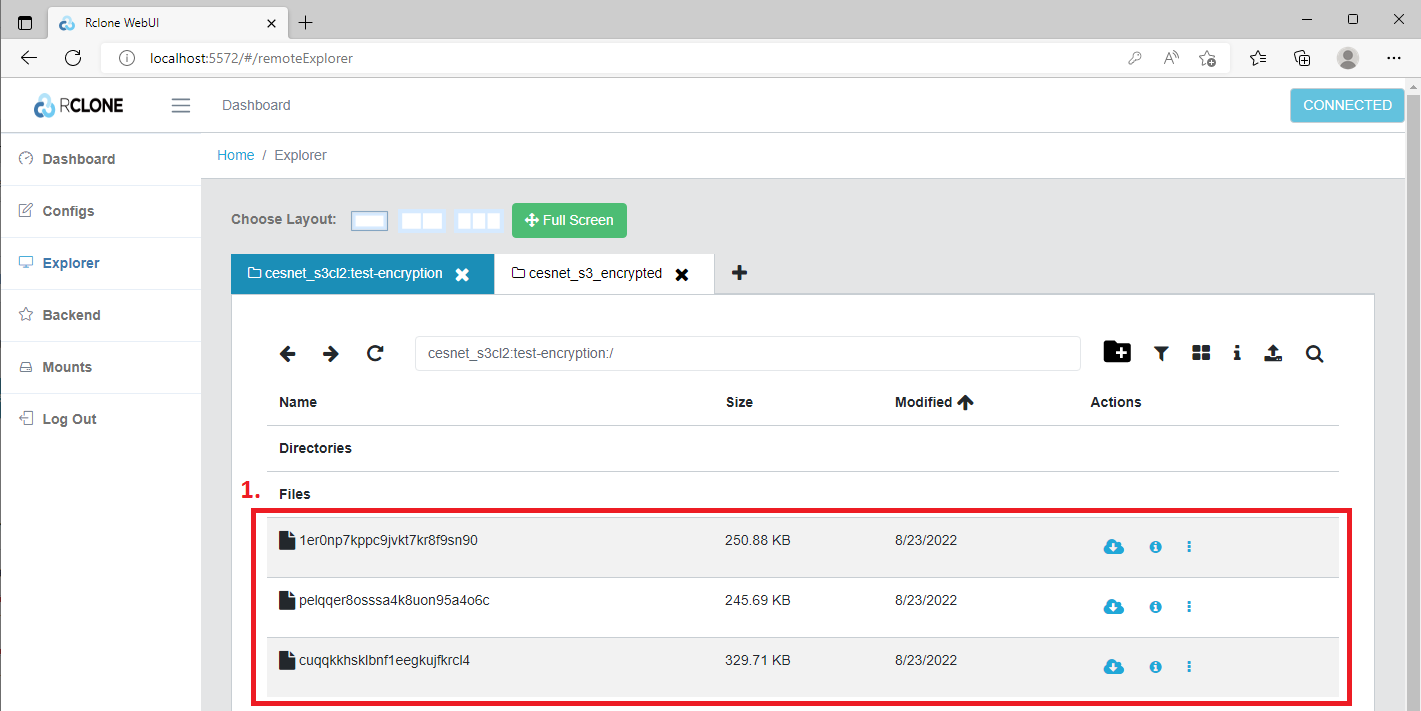
Now we can have a look into encrypted bucket (1).
Indeed we can see that our three pictures (1) have been encrypted.
Check of encrypted data integrity
To check encrypted data integrity it is necessary to use the command cryptcheck, see below. Using the common workflow for data integrity checks will cause significant difficulties in the encrypted bucket. It can result in forced downloading of all data from the remote site so it can stall your client.
rclone cryptcheck --fast-list C:\Users\Albert\Desktop\test_sync shared_encrypted:dir01/

2022/08/29 16:57:45 NOTICE: Encrypted drive 'shared_encrypted:dir01/': 0 differences found
2022/08/29 16:57:45 NOTICE: Encrypted drive 'shared_encrypted:dir01/': 14 matching files
Sharing of encrypted buckets
The buckets can be shared within the mutual space called the tenant or between users using the bucket policy. If you wish to share the buckets equipped with the encrypted volume you need to share the credentials (for encrypted volume in your bucket) with your colleagues. A shared bucket has to have a properly set up bucket policy.
Once you configure the encryption in your bucket you just need to share the encryption passwords, you used during the encrypted bucket creation and the bucket name with your colleague. Your colleague can use the guide above to configure corresponding encrypted buckets on his/her machine using the passwords, you shared.
Compromitting of encrypting passwords vs. loss of encrypting passwords
Compromitting of encrypting passwords
In case of compromitting or leakage of your encrypting passwords or in the situation that you need to change the passwords is only possible to create a new encrypted volume with new encrypting passwords. All data has to be transferred to the new encrypted volume and the old one should be deleted.
Here you have two general options. The first option is to upload your data from the local machine to the encrypted volume if you have them locally. Then you can delete the old encrypted volume.
The second option is to transfer the data using rclone. You can use rclone to copy the data from the old encrypted volume to the new encrypted volume. The advantage of this method is that you don't have to download all data locally to your machine and then upload it again, see the example below.
rclone copy old_encrypted_drive:dir01 new_encrypted_drive:dir01
Loss of encrypting passwords
Loss of encrypting passwords always means data loss!
Where to find configuration file from the encrypted bucket
Windows
C:\Users\DedaLebeda\AppData\Roaming\rclone\rclone.conf
Linux
~/.config/rclone/rclone.conf


