Table of Contents
ownCloud - old Guide ver 8.2
We are running the cloud storage service ownCloud at https://owncloud.cesnet.cz. This application is best suited for smaller amount of files that you want to access via web interface. You can sync your files between PC or mobile devices or share them with your colleagues. You can also use ownCloud to share contacts and calendars.
To use ownCloud you have to be an employee or a student of an academic organization. For technical reasons, you have to have an account in eduID.cz. 1). You have to agree with terms of the service as well. There is no need to register anywhere, your account will be created automatically when you log in for the first time.
Data are backed up once a day and the service is running in high-availability mode.
It is important to realize that the synchronization tools ARE NOT backup tools. Therefore you should also BACK UP your files synced through ownCloud.
How to log in:
- On the website https://owncloud.cesnet.cz click on the "eduID.cz" button
- After that you are redirected to the website, where you will choose your organization (e.g. CESNET, CTU, MUNI, etc.)
- Once you have chosen your organization you are redirected to that organization's login page
- If your logging in was successful you are redirected back to owncloud.cesnet.cz
- Now you can enjoy ownCloud service
After first logging in you will be notified via email.
Desktop client
Download here: http://owncloud.org/sync-clients/
Desktop client usually check automatically for new versions. So the Desktop client can be updated immediately after the new version release. If you wish you can download the newest version at ownCloud web.
password_client Desktop client password can be set in the web interface. You have to click on your name in the upper right corner and select Personal. Then you have to scroll down to 'Client login credentials' section and now you can click on "Set client password" for client apps. You will receive new email with the link for client application password setup afterwards. Received link is valid for 15 minutes.
In the same time don't forget to note your Username in the page 'Personal' (see screenshot below). Those information will be required in the desktop client setup in the following tutorial, e.g. for Windows client.

We will enter these information in Desktop client app later on. In the following we will describe setting up for Windows Desktop client.
Let's start with downloading of the Desktop client from ownCloud website and run the installation. In the "Server address" box we will enter CESNET ownCloud server address https://owncloud.cesnet.cz and then "Next".

Now we can enter username and password (set up in previous step) and then "Next".

You can keep the path on local drive (default path), or you can change it. Now just click on "Connect…" and your ownCloud is set up.

Last dialog box lets you to choose to go either to the local directory, where was mounted your ownCloud storage, or to go to your ownCloud data storage via web interface.

Mobile client
Download here :
Windows Phone (unofficial client)
For an access via mobile client it is necessary to set up the password, see the section Desktop client.
First steps after the Desktop client installation
Disabling the synchronization of the Shared folder into the local directory
Step-by-step guide how to tweak the rules (see the image):
- Open your Desktop client and then click on "General" in upper side of the dialog box. Then click on "Edit Ignored Files" box
- Then click on "Add" and add new rule
- Now enter "Shared/*" (without the quotes) and check the box
By tweaking the rules you can tell to your Desktop client to ignore synchronization of Shared directory. Files shared with you are still available via web interface, where you can easily download them.

Setup of client sync frequency
Desktop client is defaultly set to check every 30 seconds for the changes in the files uploaded in the ownCloud server. Sometimes it can be desirable to set up sync frequency higher or lower. Sync frequency can be set in the ownCloud configuration file, which can be found in:
- Linux:
$HOME/.local/share/data/ownCloud/owncloud.cfg
- Windows:
%LOCALAPPDATA%\ownCloud\owncloud.cfg
- Mac:
$HOME/Library/Application Support/ownCloud
You can add new row remotePollInterval=30000 into the section [ownCloud], where the numeral value is desired sync frequency in milliseconds .
How to share your files
In ownCloud, you can share any file with any other registered ownCloud user. To share your files with an user you have to know the ownCloud username or email of the user. Sharing setup is shown on the following figures.
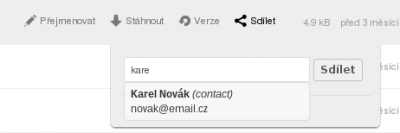
1. Choose the file, which you'd like to share. Now click on the button which is represented via share icon (see fig below).

2. On the right side there will appear the panel with the field for entering the username of the person with who you want to share your file.

3. You can enter the username (either you know it or you have to ask).
Keep in mind that you can share your files with registered users only.

4. After entering the username we can set up sharing properties. We can choose if the user can either share again or edit your file. You can also stop to share any file with the user (click on the recycle bin symbol next to the name of the user).

Shared files will appear in the folder Shared.
Sharing your files and occupied space
Space occupied by the shared files is counted into the occupied space of the user who created this files.
Shared files
If user A shares a file F with user B, size of the file F will be counted into the user A's occupied space. This is also valid in case of change or increasing the size of the file F by the user B.
Shared directories
If user A shares a directory D with user B, any file uploaded or changed in the directory D by the user B is counted into the user A's occupied space.
Sharing the files with contacts
Often you need to share your files with known persons, you can utilize sharing via "Contacts" app. This method will simplify and make faster entering the username of the persons to whom you wish to share your files. In the following is shown the method how to add selected users into your contact list .
1. Click on Files (left up corner) and then on Contacts.

2. Now you can create the contact (New contact) or create the group (New group) to agregate your contacts.

3. If you have chosen New contact, you shall see the window showed below. You can find an user info herein. Then save the contact.

After you filled your contact list with contacts, you can utilize autocompletion in the sharing window. Autocompletion is searching in your contacts based on username and email address.
Share via link (public sharing)
Except sharing between the ownCloud users, you can also share any folder or file with the persons, who don't have ownCloud account.
Sharing method is shown on following fig:

- Choose the directory or file which you'd like to share and click on share icon
- After checking Share link there will appear the box for setting the password
- Enter the password
- If you want to allow the others to upload files into this directory, please check Allow editing.
- You can also set expiration date via "Set expiration date".
- Now you can copy the link and send it (also with the password) to the persons to whom you wish to share the directory. Alternatively you can use "Email link to person".
Access via WebDAV protocol
To access your ownCloud storage you can also use WebDAV protocol.
Use this address for the access via WebDAV protocol:
Mounting ownCloud via WebDAV protocol in Linux
Firstly it is necessary to install drivers for WebDAV.
apt-get install davfs2
After the drivers installation it is possible to attach the ownCloud volume as an file system.
Command mount is necessary to enter under the root account or via command sudo .
(sudo) mount -t davfs https://owncloud.cesnet.cz/remote.php/webdav/ /mujMountPoint
Enter your login and password. You have to use the password set up for the Desktop client apps.
After logging in you supposed to see in log of command mount following items.
https://owncloud.cesnet.cz/remote.php/webdav/ on /storage/owncloud type fuse (rw,nosuid,nodev,relatime,user_id=0,group_id=0,allow_other,max_read=16384)
In specified location at myMountPoint you supposed to see accessible files from your ownCloud data storage.
Mounting ownCloud via WebDAV protocol in OS X
WebDAV protocol is generally supported in OS X, so there is no need to install additional app.
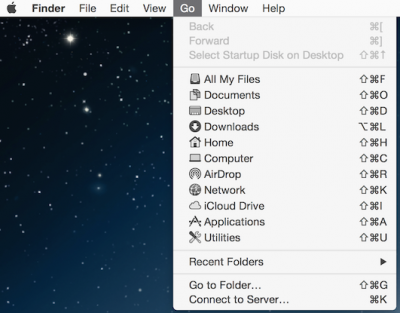
In the Finder app choose from the menu Go > Connect to Server (Eventually you can use the keyboard shortcut ⌘K.)
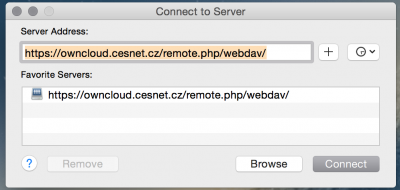
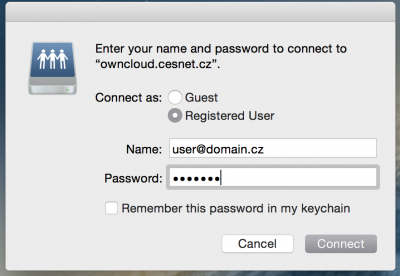
In the dialog box you have to enter the ownCloud server address (see Access via WebDAV protocol) and then click at Connect, then enter your username and password. The password is the same, which you set up for Desktop client apps.
Mounting ownCloud via WebDAV protocol in Windows
On Windows you can assign ownCloud a drive letter. The ownCloud storage can be mapped via the command line by using:
net use Z: https://owncloud.cesnet.cz/remote.php/webdav /user:username@realm.cz
or by using graphical interface, which is shown further.
Click at This PC at upper panel click on Computer and then click at Map network drive .

In the dialog box in the field Drive you have to specify the drive letter for the connection (e.g. A). In the field Folder you have to enter the ownCloud server address (see Access via WebDAV protocol), then click Finish. In the next dialog box enter your username and password. The password is the same, which you set up for Desktop client apps. Now you can browse your ownCloud folder via Windows Explorer.

- Run Registry editor (regedit) and find the DWORD FileSizeLimitInBytes in HKEY_LOCAL_MACHINE\SYSTEM\CurrentControlSet\Services\WebClient\Parameters.
- On the Edit menu click Modify. Then in the Base pick the Decimal and in the Value data box insert 4294967295.
- Now you can close the Registry Editor and restart your Windows.
Disable/Enable auto updates of the client app
Version 1.7 and newer of ownCloud Desktop clients have an auto updates. These auto updates is impossible to disable in graphical interface. In case you want to keep the specific ownCloud Desktop client version you have to disable auto updates. Disabling auto updates could be useful in case of any bugs in the new ownCloud Desktop client and so on. To disable auto updates it is necessary to change configuration files or registry.
In the following sections you can find the methods for disabling/enabling the auto updates for Windows and other platforms.
Windows - registry key (simple version; run as administrator)
You can disable the auto updates by entering registry key skipUpdateCheck type DWORD and value 1.
We also prepared registry keys. You can download our *.reg files from the links below. This registry keys could be easily installed. Just click on them and then confirm the inserting of the keys to your registry. All changes will appear after you restart your PC.
- Windows 32bit
- Windows 64bit
Windows - modify config file in LocalAppData
In your user folder locate file %LOCALAPPDATA%\ownCloud\owncloud.cfg (commonly located in %LOCALAPPDATA% on the path C:/Users/<jmeno>/AppData/Local and the folder AppData is hidden, so you have to enable Show hidden files).
You can open owncloud.cfg file via Notepad. In the section [General] enter this row:
skipUpdateCheck=true
In case you want to enable auto updates change the value true to false, or remove the row skipUpdateCheck=true.
Other platforms - Linux, OS X
You can locate config file in Linux in ~/.local/share/data/ownCloud/owncloud.cfg.
in OS X is config file located in ~/Library/Application\ Support/ownCloud/owncloud.cfg.
You can open owncloud.cfg file via text editor. In the section [General] enter this row:
skipUpdateCheck=true
In case you want to reenable auto updates change the value true to false, or remove the row skipUpdateCheck=true.
What to do in case of any problems
In case of any problems or questions please feel free to contact us at support(at)cesnet.cz.
You can also see full ownCloud User Manual
However this guideline doesn't respect our modifications.
Frequently Asked Questions (FAQ)
We do not recommend you to use Internet Explorer 11. JavaScript required for ownCloud web interface is not working properly.
Internet Explorer 6 is using vulnerable SSLv3. By the reason of keeping the security, our servers require TLSv1.0 and higher. Thus it is necessary to use web browser, which doesn't use SSL, but TLS.
I've just logged in and I can't see my files
Problem description I have logged in via different identity provider compare to my first logging in. Now I don't see my files. Why?
Solution: We suppose, that you have used different identity for your current logging in than in the past. In case you have used more identities of different organizations, for each of your identity (past and current one) was created new ownCloud account. For this kind of issue is necessary to join (consolidate) both your identities into one. So afterward no matter which identity you will use you shall see still same files. To consolidate your identities please contact us at support(at)cesnet.cz
After I uploaded my file I cannot see it
Problem description I was uploading file via web interface. After it finished I cannot see my file. Why?
Solution: Uploading of one file via web interface is possible maximally for 4 hours. If you will upload your file via ownCloud Desktop client this restriction is invalid. So to upload your files, please use Desktop Client, see the section Desktop client
Problems related to Desktop Client connection
1) Problem description OwnCloud Desktop client is after entering my username and password saying "Could not connect securely: Operation cancelled".
1) Solution: To use ownCloud Desktop Client you have to use your user name, which is listed in "Personal" section (Please log in to the web interface → In right up corner click on your name → Personal). Further it is necessary to setup separate Desktop Client password as is described above. The problem can be also caused because of some special characters in your password.
2) Problem description My client cannot connect to the ownCloud server even I am using correct password.
2) Solution:
Please make sure you have new ownCloud client version. For instance version 1.5, 1.6 are not compatible with ownCloud 9, which we are running. If you have old version please update it.
We recommend you to use for update: ownCloud webpage, where are available official Dekstop clients for various platform i.e. Windows, OS X and Linux. For Linux is also useful to install repository. Due to this repository you can install new versions in common way (apt-get update, yum update …).
Problems with file sharing
Problem description I am trying to share file with my colleague and I cannot find his/her username (email address).
Solution: Due to security reasons is unsuspecting prohibited. To share given file with any user, this user must be registered in the service https://owncloud.cesnet.cz/. Further you can use sharing by utilization of ownCloud contacts. Other possibility is to know full username of your colleague. The user name is not necessarily email address, which you are used to use. Your colleague can find the username in page "Personal" in ownCloud web interface (Please log in to the web interface → In right up corner click on your name → Personal).
Synchronization of the executable file
Problem description I have synced executable file from one computer to the second computer. However the file is not executable on the second computer.
Solution: ownCloud server is not supporting the transmission of the file permissions. During the file transmission from one client to the second client are the the file permissions lost. More info at: https://github.com/owncloud/core/issues/6983
Problem with synchronization of some directories
Problem description OwnCloud refuse to sync some folders. It says: "There are available new directories, which have not been synced because of their large size see: ownCloud/… (directory list)."
Solution: The solution is to open the list of folders and pick all the large folders. Then click on "Apply" on the bottom of the error message.
Problem with synchronization of the files with long name
Problem description OwnCloud refuse to upload the file with very long name. Synchronization end up in "Connection closed nebo Bad Request".
Solution: Maximum length of the file name is 210 characters.